
How to Install Recessed Lighting
A licensed-grade walkthrough of recessed lighting installation, from choosing new-work, old-work, or canless housing to wiring, clearances, dimmers, code, and cost.
Recessed lighting installation looks intimidating from the floor, but most of the job is carpentry with one electrical step in the middle. You cut a hole, join three wires, and clip the fixture into the ceiling.
What decides whether it is safe and whether it passes inspection is the housing you pick, the clearances from insulation and framing, a circuit that carries the load, and a dimmer that will not buzz.
What recessed lighting is, and the parts you will handle
A recessed light sits up inside the ceiling so only its trim shows. Can light, pot light, downlight, high hat: all the same fixture. The real split is between a traditional can, a metal housing you fit a bulb or LED module into, and a canless unit, also sold as a wafer or ultra-thin light, with the LED built into a thin disc.
The housing mounts in the ceiling and carries everything else. Your cable lands in the junction box, attached to the housing on modern IC and canless fixtures. The lamp or LED module makes the light, and the trim is the visible ring that finishes the opening and shapes the beam.
Count and spacing are a layout problem of their own, handled by the recessed lighting calculator.
Before you buy: five checks
Each of these can change which fixture you buy, and two can stop the project.
- Cavity depth. From the attic, measure from the top of the drywall to the top of the joist. With no attic, drill a 3/8 inch hole where a fixture will go and sweep a hooked wire until it touches the floor above. Under about 4 inches, canless is your only option.
- Joist direction. Joists usually run 16 inches on center, leaving about 14 1/2 inches of clear bay. A row running along a bay is easy. A row across the joists means drilling every joist between them.
- Ceiling material. Drywall cuts cleanly. Plaster and lath, common before about 1950, chips, so score the circle first and cut slowly. A textured or popcorn ceiling from before 1980 may contain asbestos: test before you cut, never sand.
- Where power comes from. The easiest retrofit reuses an existing ceiling fixture: pull the old light and feed the first can from its box, keeping the cable and wall switch.
- Neutral at the switch. Take the plate off and look. A bundle of white wires means you have a neutral, which most smart and electronic dimmers need. Two wires and a ground means an old switch loop, so buy a dimmer that runs without one.
Choosing your housing: new-work, old-work, or canless
Two things decide the housing: whether the ceiling is open or finished, and whether you can get above it. Open framing takes a new-work housing. A finished ceiling takes an old-work housing or a canless unit, both of which go in entirely from below.
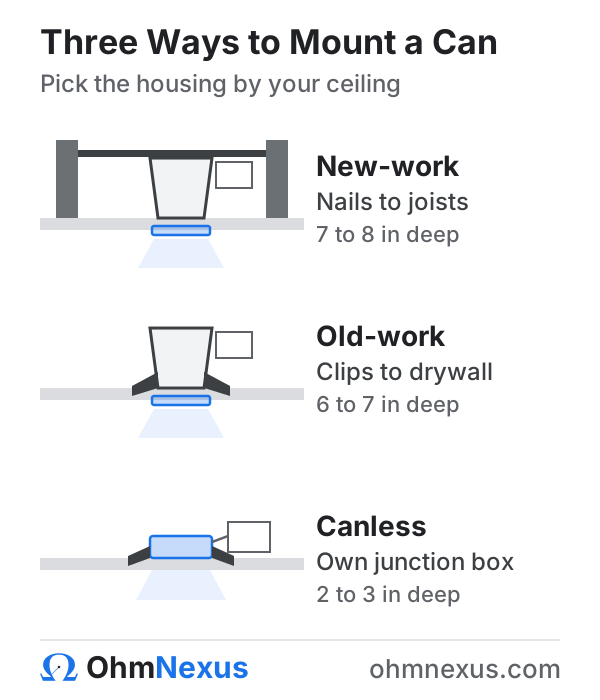
Recessed housing types compared
| Housing | Best for | Ceiling depth needed |
|---|---|---|
| New-work (new construction) | Open framing, a gut remodel, an unfinished basement | Full can depth, often 7 to 8 in |
| Old-work / remodel | A finished ceiling with a deep enough cavity | Roughly 6 to 7 in of clear cavity |
| Canless (integrated LED) | A finished ceiling, shallow cavities, most retrofits | As little as 2 to 3 in |
Cutouts are not the fixture’s nominal size, and the template in the box beats any number you read. Roughly: a 4 inch fixture wants a 4 1/8 to 4 1/4 inch hole, a 5 inch wants 5 to 5 1/8, a 6 inch wants 6 1/4 to 6 3/4.
Ceilings that need a different fixture
Four ceilings change what you can buy, and the first is a safety gate.
- Fire-rated assembly (condos, multi-family, the ceiling under a garage or living space): the rating has to be maintained. Use fixtures listed for the assembly or add fire-rated covers. Verify before you cut.
- Sloped or vaulted: use a fixture made for the pitch, or a gimbal trim, so the beam lands on the floor instead of raking the far wall.
- Tray or coffered: put cans in the raised center or ring the perimeter, keeping them off the sloped transitions.
- Drop or suspended: use fixtures built for the grid, and check the plenum rules, since air-handling ceiling spaces carry their own requirements.
Fixture ratings: IC, airtight, and wet or damp locations
The rating on the box is a fire rule, not marketing.
IC, non-IC, and the three clearances
A recessed luminaire is either Type IC, identified for direct contact with thermal insulation, or non-IC, which means insulation has to stay away from it. The NEC sets the clearances in Article 410, Part X (Special Provisions for Flush and Recessed Luminaires), specifically 410.116.
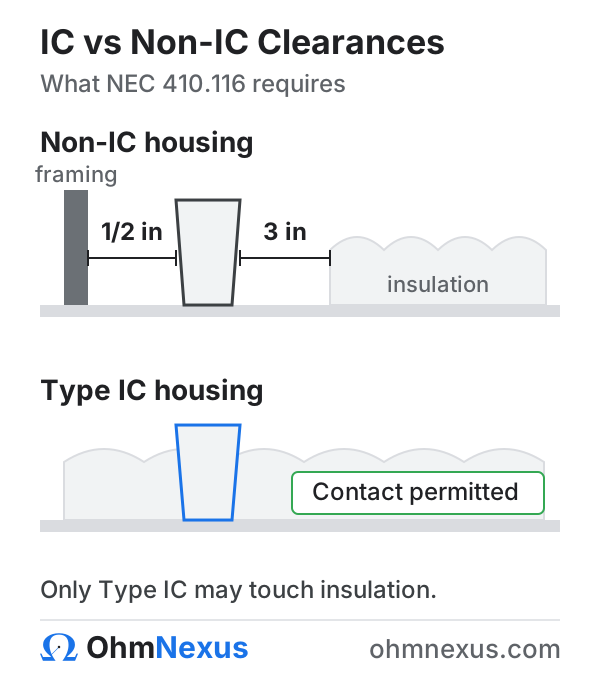
The code keeps three clearances separate, and so should you:
- 1/2 inch from combustible material for a non-IC fixture, so the housing stays off wood framing at any point that is not a designed support.
- 3 inches from thermal insulation for a non-IC fixture, measured from the enclosure, wiring compartment, or driver. A non-IC can sheds heat into the cavity, and buried insulation traps it.
- Direct contact for a Type IC fixture, which is built and tested to run buried in insulation.
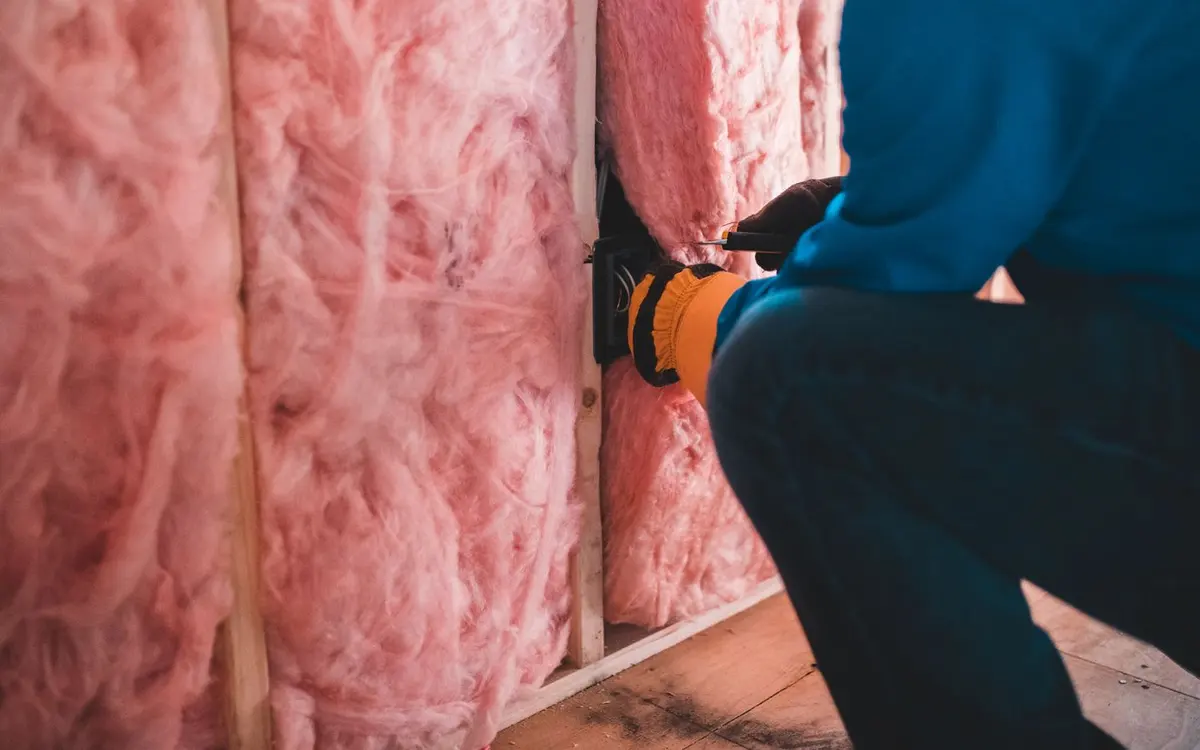
If there is insulation above the ceiling, an attic, a top-floor ceiling, an exterior soffit, buy IC-rated. Keeping blown insulation 3 inches off a can for the life of the house is not realistic.
Airtight (AT)
Airtight is the second rating, and it is about energy rather than fire. It is a testable spec, not a marketing word: fixtures are rated for measured air leakage under ASTM E283, and energy codes lean on that number. On any ceiling below an unconditioned space, buy IC-AT. A leaky can pushes warm, moist household air into a cold attic, where it condenses, and in winter that feeds attic frost and ice dams.
Bathrooms, showers, and outdoors
Damp locations, meaning a general bathroom ceiling, a covered porch, or an eave, call for a damp-rated fixture. Anywhere water lands directly, inside a shower or tub enclosure or an open soffit, needs a wet-rated one.
The NEC draws the line in 410.10(D), which defines a zone 3 feet horizontally and 8 feet vertically from the tub rim or shower threshold. Inside it you cannot use cord-connected, chain- or cable-suspended, track, pendant, or paddle-fan fixtures. A recessed can is allowed, which is why it is the usual answer over a shower. Within the tub or shower footprint up to 8 feet it must be marked suitable for damp locations, and where it takes direct spray, suitable for wet locations. Shower trims are sealed with a lens for that reason.
Planning your layout: how many lights and where
Plan on roughly 4 to 6 recessed lights in a 12 by 12 foot room with an 8-foot ceiling, then adjust for how the room is used and how bright each fixture is.
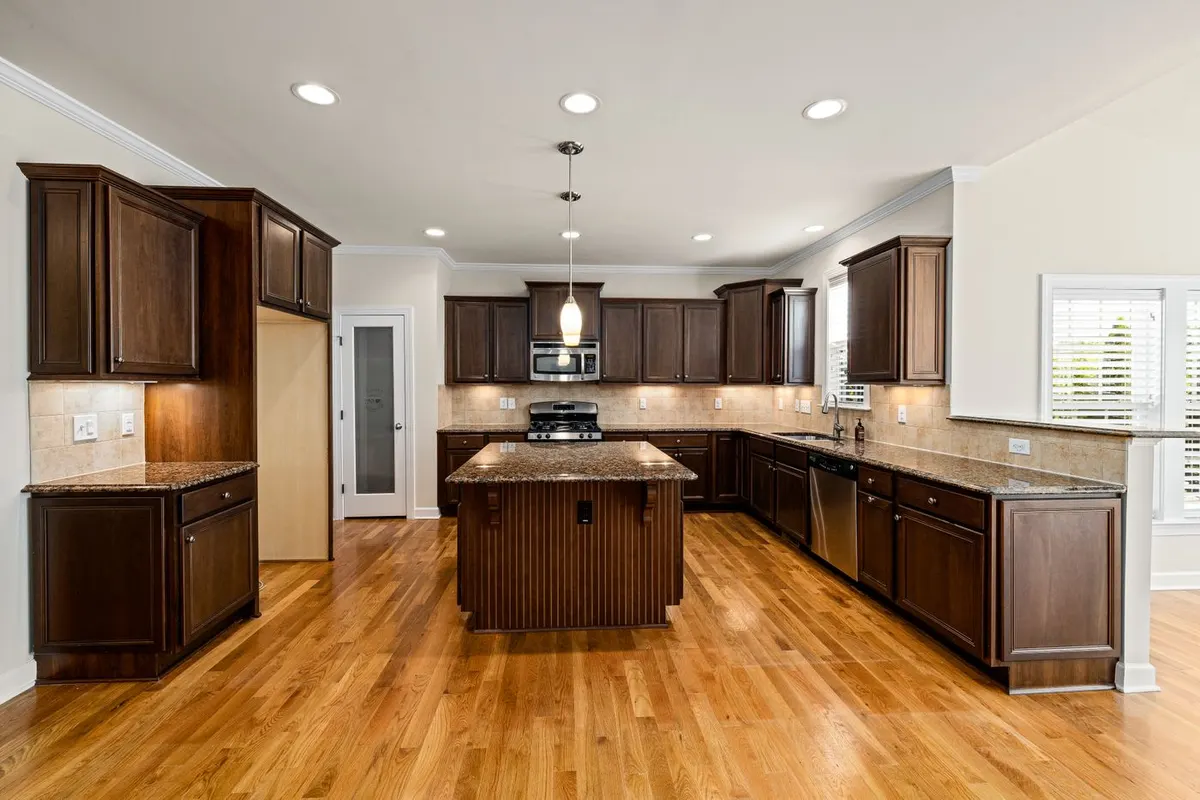
The rules of thumb you have read, ceiling height divided by two, a flat 4 to 6 feet apart, one fixture per 25 to 35 square feet, all approximate the same brightness target. Better to start from the light you want on the floor and work back to a count, which is what the recessed lighting calculator does from your room size, ceiling height, and room type.
Keep the first row about 2 to 3 feet off the walls, roughly half your between-light spacing, so the walls get light and the ceiling does not scallop. Mark every location before you cut and check it against the furniture. A can centered over the sofa is a can aimed at the back of someone’s head.
Choosing the light: color temperature, lumens, CRI, and beam
For most rooms, buy 3000K, 90+ CRI, and a wide beam. If you remember one line from this section, that is it.
| Color temperature | Looks like | Best for |
|---|---|---|
| 2700K | Warm, yellow, like an old incandescent | Bedrooms, cozy living rooms |
| 3000K | Soft white | Most living spaces, the safe default |
| 3500 to 4000K | Clean neutral | Kitchens, bathrooms, laundry |
| 5000K | Crisp daylight | Garages, workshops |
Lumens measure brightness, and a 6-inch recessed LED typically puts out 650 to 1,200. That figure on the box is measured under ANSI/IES LM-79, so it is comparable between brands, unlike the wattage it replaced. CRI tells you how true colors look; 90 or higher matters wherever you care about food, skin, or paint. Beam angle sets the spread, so 60 degrees or wider suits general lighting and a narrow beam accents art. Many canless fixtures carry a switch to pick the color temperature at install, which is worth having.
The trim shapes the beam as much as the look. Baffle trims have ridged walls that swallow glare, so they belong over a sofa. Reflector and cone trims throw more light, which earns their place in a kitchen. Gimbal and eyeball trims swivel to aim at art or down a slope, and a wall-wash trim rakes light down a bookcase. On canless units the style is built in, so choose it when you buy.
The circuit: load, wire gauge, breaker, and AFCI or GFCI
Size the circuit by total wattage, not by a fixture count, and leave headroom below the breaker rating. A 15-amp, 120-volt circuit is good for 1,800 watts. The NEC does not treat general lighting in a dwelling as a continuous load, so that is the code figure, but electricians design to about 80 percent, or 1,440 watts, to leave room. Where a load genuinely runs three hours or more, NEC 210.19(A) and 210.20(A) make that 80 percent ceiling mandatory. A 20-amp circuit gives you 2,400 watts, or 1,920 watts at the same margin.
At 10 to 15 watts a can, the circuit is rarely what stops you. The dimmer usually is.
The conductor follows the breaker: 14 AWG copper on a 15-amp circuit, 12 AWG on a 20-amp circuit. Tapping an existing circuit means adding your load to what is already there. Confirm it with the wire size calculator, or check what a gauge carries in the wire gauge chart.
Two protection systems apply to the circuit, and they are easy to mix up:
- GFCI (NEC 210.8) protects people from shock at receptacles. In dwellings, 210.8(A) reaches further than most people assume: bathrooms, kitchens, garages and accessory buildings, outdoors, crawl spaces, unfinished basements, laundry areas, bathtub and shower areas, and anywhere within 6 feet of a sink. The 2020 edition widened it from 15- and 20-amp 125-volt receptacles to all 125 through 250 volt receptacles on those circuits, and 2023 pulled in every kitchen receptacle rather than only the countertop ones. GFCI covers outlets you plug into, not the hardwired light itself, though a shower fixture’s instructions or your local code may still call for it.
- AFCI (NEC 210.12) protects against arcing faults on the branch circuit, and it does cover your lights. A recessed-lighting circuit feeding bedrooms, living areas, kitchens, hallways, closets, or laundry needs AFCI protection, because a luminaire counts as an outlet under that rule. In practice the breaker feeding your new cans is an AFCI or a dual-function AFCI/GFCI.
Wiring recessed lights: connections, boxes, and support
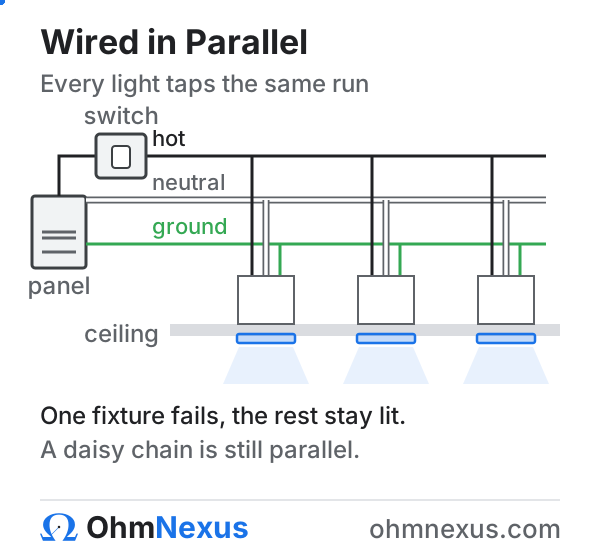
Recessed lights are wired in parallel, and the daisy chain between them is parallel wiring, not series. At each fixture the incoming and outgoing cables land together, black with black, white with white, ground with ground, so every can sees the full 120 volts.
- Use the fixture’s own junction box. IC and canless fixtures include a listed one, so land your cable there rather than burying a splice. Every splice belongs in a box that stays accessible without cutting into the building (NEC 314.29), and since 2020 a recessed luminaire may not serve as the access point for a box that is not part of the fixture (410.118).
- Bond a metal housing. A metal can is a conductive enclosure, so the grounding conductor lands on its green screw or ground lead. Pigtail the grounds rather than trusting a cable clamp for continuity.
- Watch the box fill. A box holds a limited number of conductors for its volume (NEC 314.16), and a fixture box carrying line-in and line-out is close to full. Needing a third cable means mounting a separate, accessible junction box in the cavity and running a short branch to the fixture.
- No ground wire in the old cable? Older two-wire cable often has none. Never invent one by bonding to a pipe. Some LED fixtures are listed for use without a ground on an existing circuit, so read the instructions, and treat a house full of two-wire cable as a conversation with an electrician.
- Support the cable. Secure NM cable within 12 inches of every box and at least every 4.5 feet (NEC 334.30). Through framing, keep the bored hole 1 1/4 inches from the edge or add a nail plate (NEC 300.4). Loose cable draped across a ceiling is a common inspection failure.
Switch and dimmer wiring: single-pole, 3-way, and LED dimming
Most runs use a single-pole switch; two doorways means a pair of 3-way switches. Flicker and buzz are what people come back complaining about, and the cause is almost always a dimmer and driver that do not get along.
LED cans use an electronic driver. Dimmers come in two families: TRIAC (forward-phase), the cheap type built for incandescent loads, and ELV (reverse-phase), which dims most LED drivers more smoothly.
- Read the LED rating, not the incandescent one. A dimmer stamped 600 watts is often rated near 150 watts for LED, which is about a dozen 12-watt cans. Total your LED wattage against that number before you buy.
- Respect the minimum load too. A dimmer with a 40-watt minimum will flicker or drop out on three 12-watt cans. Stay above it, or buy a dimmer built for small LED loads.
- Use a dimmer the fixture maker lists. Quality LED cans publish a compatibility list, which beats the marketing on the dimmer box.
- Match the phase type to the driver. If a TRIAC dimmer buzzes or steps, an ELV dimmer with an ELV-compatible driver usually cures it.
Before you cut: tools, materials, and proving the power is off
Gather everything first. The tiring part of this job is the ladder.

- Layout and cutting: tape measure, pencil, stud finder, and a hole saw or adjustable drywall cutter sized to the fixture’s template.
- Electrical: a non-contact voltage tester, wire strippers, lineman’s pliers, connectors, cable staples, nail plates, and the right cable. Usually 14/2 or 12/2 NM, the flat plastic-sheathed indoor cable sold as Romex: the first number is the gauge, and /2 means two insulated conductors, black and white, plus a bare ground.
- The fixtures: housings or canless units, trims if separate, and a compatible dimmer.
- Access and safety: a sturdy ladder, safety glasses, a dust mask, and a drop cloth.
Turn the circuit off at the breaker, put the wall switch off, then prove the wires are dead with a non-contact tester before touching them. Test the tester on a known-live circuit first. If you cannot identify the breaker, turn off the main.
Installing recessed lights, step by step
Open ceiling (new construction)
Install recessed lights in open framing
- Lay out the fixtures. Mark each location from your plan or the recessed lighting calculator, keeping cans off the joists and 2 to 3 feet from the walls.
- Mount the housings. Extend the bar hangers to the joists either side of each mark so the rim sits flush with the finished drywall. Set the depth now; it is hard to fix later.
- Run the cable. Pull 14/2 or 12/2 from the switch location to the first housing, then housing to housing.
- Support and protect it. Secure the cable per NEC 334.30 and protect it through framing per 300.4, as covered above.
- Wire each housing in parallel. Open the junction box, bring the cables through the clamps, and make the three connections, leaving enough free conductor to work with.
- Set clearances, then let the ceiling be finished. Keep insulation back to suit the rating of your cans.
- Trim, lamp, test. After paint, clip in the trim, restore power, and check every fixture and the dimmer.
Finished ceiling (retrofit)
Retrofitting is where most people actually work, and it is slower because the ceiling is closed and you are fishing power blind.
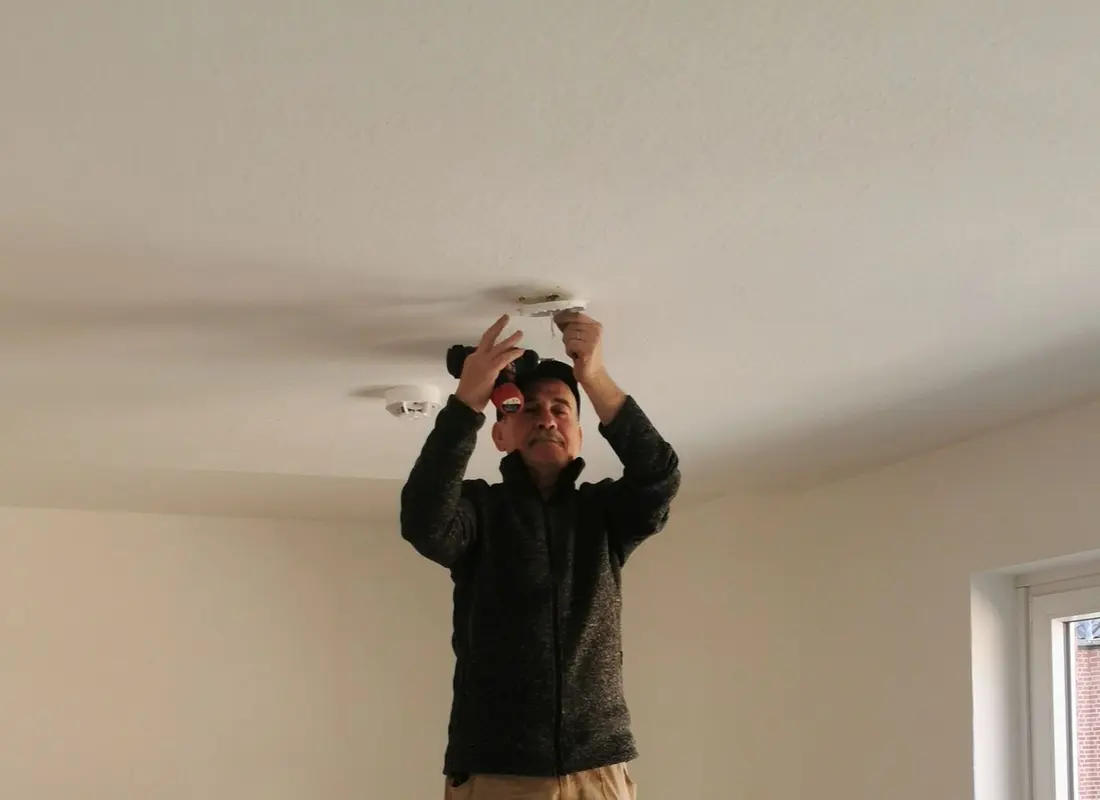
Retrofit recessed lights into a finished ceiling
- Kill the power and prove it is dead. Switch off the breaker feeding the circuit, leave the wall switch off, and confirm with a non-contact tester at the existing fixture before anything else.
- Plan the power source. The usual retrofit reuses an existing ceiling light: pull the old fixture and feed the first can from its box, keeping the cable and wall switch.
- Find the framing and check the bay. Locate the joists with a stud finder and keep holes between them. Before committing, drill a small hole and sweep a bent wire inside to probe for pipes, ducts, and wiring. Ten seconds here saves a patched ceiling.
- Trace the template and cut. Hold the fixture’s template to the ceiling, trace it, and cut with a drywall saw or hole saw. Cut to the template, not a guessed size, and go slowly on plaster.
- Fish the power. With attic access, run and support cable from above. Without it, cable only travels freely along a joist bay, so a row across the joists means drilling each one. This is where an electrician earns the fee on a tricky ceiling.
- Connect at the junction box. Bring the cable in through the connector and make the same three connections.
- Test before you commit. Restore power once, confirm every fixture lights, then kill it again. Finding a loose connector now takes a minute; finding it after six units are clipped in takes an afternoon.
- Tuck and set. Fold the junction box up into the cavity, squeeze the spring clips, and push the unit in until the clips snap out and pull it tight.
Fixing mistakes
Ceilings are forgiving if you know the repair.
- Hole slightly too big or off-center: a goof ring, an oversize trim ring costing a few dollars, covers a cut up to about an inch oversize.
- Hole in the wrong place: cut a clean rectangle around it, back it with a scrap of wood screwed inside the cavity, add a drywall patch, then tape, mud, and sand.
- You hit a joist: move the fixture. Never notch a joist to fit a can.
- Cracked plaster around the cut: stop cutting, score the perimeter with a utility knife, and finish with a rasp rather than the saw.
Replacing and changing out recessed lights
Replacing recessed lighting is the easiest job here: the hole, the housing, and the circuit already exist. Three cases.
Drop in an LED retrofit module. If an old can works but you want modern light, this is the quick fix. It screws into the socket with an adapter and clips up behind the trim, so a fixture takes minutes with no wiring. That is how most people move halogen or incandescent cans to LED.
Change an old can out for a canless unit. Worth it if the housing is ugly, runs hot, or is a non-IC can buried in insulation. Cut the power, disconnect the old housing, and connect the canless unit to the existing cable at its junction box, reusing the opening. Keeping the hole makes it a no-patch job and upgrades you to IC-AT.
Replace a failed integrated fixture. A canless unit is replaced whole, since the LED is built in. Kill the power, release the clips, disconnect, and reverse the steps.
None of the three is more than an afternoon, and each is a good moment to move to smart or tunable fixtures. Because the run is parallel, you can swap one fixture without disturbing the rest.
What recessed lighting installation costs
Recessed lighting installation costs about $100 to $300 per light installed by a professional, or roughly $20 to $60 per fixture in materials if you do it yourself. Three things move that number:
- Ceiling access is the biggest lever. Wiring cans into an open ceiling is far cheaper than retrofitting a finished one, often by 40 to 50 percent per light, because fishing wire and patching is where the hours go.
- Whether a new circuit is needed, since a home run to the panel adds electrician time.
- The grade of fixture and trim you choose.
This is a planning range, not a quote. Get a couple of local estimates.
Permits, inspection, and code compliance
Adding or extending a circuit usually needs a permit, and the inspection is worth having, because it catches the mistakes that start fires. Swapping a fixture on existing wiring generally does not need one, but new cable, a new circuit, or panel work typically does.
An inspector will look at:
- The right IC or IC-AT rating anywhere there is insulation.
- The 410.116 clearances.
- Cable supported per 334.30 and protected through framing per 300.4.
- Junction boxes that stay accessible per 314.29.
- AFCI protection on the branch circuit.
- Correct wire and breaker sizing.
Your jurisdiction adopts a specific NEC edition and can amend it, so call the local building department before you start and build to the rules they will inspect against.
Troubleshooting
- Flicker or buzz on the dimmer: check the load before blaming the dimmer. Three 12-watt cans under a 40-watt minimum will misbehave, and so will a dozen cans on a dimmer rated 150 watts for LED.
- A light cycling on and off: thermal shutdown, usually a non-IC can buried in insulation or a cavity with no room to breathe.
- One light out, the rest fine: a failed module or a loose connection at that fixture, not the circuit. Kill the power and recheck its connections.
- The breaker trips: an overloaded circuit, a wiring fault, or an AFCI or GFCI breaker doing its job. Never fit a bigger breaker to stop it, because the breaker is protecting the wire.
Maintenance is light. Integrated LED cans run for tens of thousands of hours, so wipe the trims occasionally and forget them. When one finally fails you swap the whole fixture instead of a bulb, which is the price of the low profile and the efficiency.
Frequently Asked Questions
Should recessed lights be wired in parallel or series?
Parallel, always. Every recessed light is wired in parallel so each fixture gets the full line voltage and one failure does not take out the rest of the run. The "daisy chain" you see between housings, where cable hops from one can to the next, is still electrically parallel, so at each fixture the black joins black, white joins white, and ground joins ground, so the fixtures sit side by side across the circuit rather than end to end. Wiring lights in true series would leave each one dim and make a single failure kill the whole string.
Does each recessed light need a junction box?
Most modern fixtures include one. IC-rated cans and canless LED units come with an attached, listed junction box, so you connect your cable inside that box and do not add a separate one. What you must never do is bury a loose splice above the ceiling with no box, or use a box that will not stay accessible, which the NEC prohibits in 314.29. If you are extending power with a mid-run splice that is not inside a fixture's own listed compartment, that splice needs its own accessible junction box.
How many recessed lights can you run on one switch?
The switch is rarely the limit; the circuit is. A standard 15-amp circuit is good for 1,800 watts, and electricians normally design to about 1,440 watts to leave headroom, so with 10 to 15 watt LED cans the circuit itself is rarely the limit. The dimmer usually is. Many LED-rated dimmers handle only about 150 watts of LED load, which is roughly a dozen cans, so check the dimmer's LED rating rather than counting fixtures, and confirm the conductor with the wire size calculator.
Can I install recessed lighting myself?
Yes for most of it, if you respect the electrical step. Marking the layout, cutting the holes, mounting the housings, and connecting a fixture's own leads are within reach for a careful DIYer who shuts the power off and confirms the circuit is dead with a tester. Running a brand-new circuit, adding a breaker, or working inside the panel is where you bring in a licensed electrician, and many jurisdictions require a permit and inspection for new wiring regardless of who does the work.
What are the disadvantages of recessed lighting?
Three things trip people up. First, every can is a hole in your ceiling, so a non-airtight fixture leaks conditioned air and, in a top-floor ceiling, can invite condensation or ice dams unless it is airtight and IC-rated. Second, the fixtures are fixed, so a layout mistake is a patched ceiling, not a moved lamp. Third, too few lights or the wrong beam spread creates a dim "cave effect" with scalloped walls. Good planning, airtight IC housings, and the right count solve all three.
How many recessed lights do I need for a 12x12 room?
About 4 to 6 for general lighting in a 12 by 12 foot room with a standard 8-foot ceiling. The exact number depends on ceiling height, the lumen output of each fixture, and how you use the room, since a kitchen work zone wants more light than a bedroom. Rather than guess, set the fixture count from a target brightness with the recessed lighting calculator, which sizes the count and spacing from your room dimensions and ceiling height.
How much does it cost to install recessed lighting?
For materials alone, budget roughly $20 to $60 per canless or retrofit fixture. Hiring a pro typically runs about $100 to $300 per light installed, and retrofitting into a finished ceiling costs noticeably more than wiring new-construction cans while the ceiling is still open, often 40 to 50 percent more per light. The big cost drivers are ceiling access, whether a new circuit has to be run, and the trim and fixture grade you choose.
References
- NFPA 70, National Electrical Code National Fire Protection Association (NFPA)
- ENERGY STAR: Recessed lighting and airtight fixtures U.S. EPA / U.S. Department of Energy
Get early access to OhmNexus Pro
Join the list for new calculators, guides and services, plus first access to our upcoming advanced and AI-assisted design tools. No spam; unsubscribe anytime.
Need more electrical tools?
View All Calculators