
Recessed Lighting Calculator
Find how many recessed lights a room needs, how far apart to space them, and how far to hold the first one off the wall. Enter the room size, ceiling height and room type, and the calculator returns a fixture count, center to center spacing, a wall offset, and a ceiling plan drawn to your room shape.
How Many Recessed Lights Do I Need? Count, Spacing and Layout
A room needs enough recessed lights to hit its target light level, arranged so no dark gaps open up between the pools of light. Those are two separate questions, and most layouts go wrong because only one of them gets answered. A 12 by 12 ft living room with an 8 ft ceiling takes four 6 in downlights at 1,100 lumens; the same room as a bedroom takes two. The level you design to drives the count more than the room size does.
The count comes from brightness. The spacing comes from geometry. When the two disagree, you have a real choice to make rather than a single right answer, which is why the calculator reports both and tells you when they conflict.
- Measure the room and note the ceiling height.
- Pick a target light level for how the room is used.
- Divide the light the room needs by what one fixture delivers to the floor. That gives the count.
- Lay the count out as a grid that follows the room shape, then check the spacing against the evenness limit.
The calculator above doubles as a layout planner, and reports the lumens each fixture must deliver to hold that level, which a count-only tool leaves out. It runs entirely in the browser, with no sign-up.
Recessed lighting spacing and how far from the wall
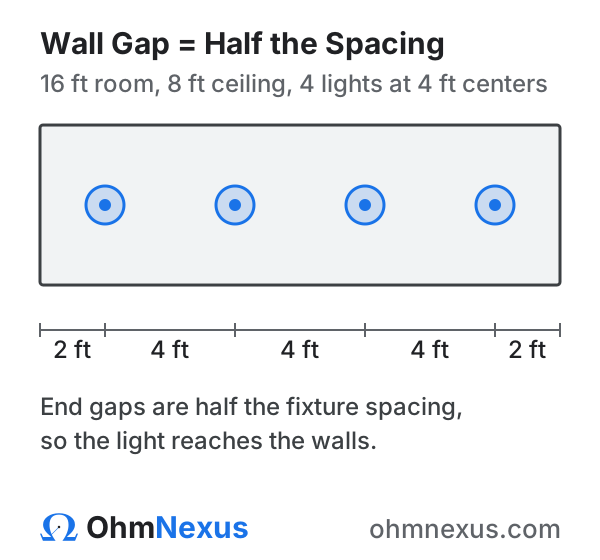
Space recessed lights about half the ceiling height apart, and hold the first row half of that spacing off the wall. An 8 ft ceiling gives 4 ft between fixtures and 2 ft to the wall. That wall rule is the part people skip, and skipping it is what leaves a bright middle and dim corners.
- S = center to center spacing between fixtures
- H = ceiling height
- W = distance from the wall to the first row of fixtures
Example: a 9 ft ceiling gives S = 4 ft 6 in between lights, with the first row 2 ft 3 in off the wall.
The half ceiling height figure is a field shortcut for the real design test. A fixture's photometric report publishes a spacing criterion, sometimes written S/MH, which is the widest spacing that still lets neighbouring beams meet at the working height. Maximum spacing is that ratio multiplied by the mounting height above the plane you care about, so a 30 in counter shortens the mounting height and tightens the spacing, while measuring at the floor allows more room.
One placement rule overrides the grid. Where you are lighting art or a fireplace wall, bring the fixture 18 to 30 in off that wall so the beam washes down the surface.
How much area does one recessed light cover?
Coverage per fixture is the spacing squared. An 8 ft ceiling at 4 ft centers gives each light about 16 sq ft of floor, and a 9 ft ceiling at 4 ft 6 in centers gives about 20 sq ft. Dividing the floor area by that figure is the quickest check on a plan, and it should land within a fixture or two of the count needed. Treat it as a coverage check rather than a design method, because it says nothing about brightness. A 144 sq ft kitchen and a 144 sq ft bedroom have identical coverage and very different fixture counts.
The lumen method behind the fixture count
Fixture count is the light the room needs divided by the light one fixture actually puts on the working plane.
- N = number of fixtures
- E = target light level in foot-candles (lux outside the US)
- A = floor area in square feet
- Φ = delivered lumens per fixture from its spec sheet
- CU = coefficient of utilization, the share of output reaching the working plane
- LLF = light loss factor, the maintained fraction of that output over time
Example: a 12 by 12 ft living room at 15 foot-candles with 1,100 lumen fixtures, CU 0.66 and LLF 0.9 gives N = (15 × 144) ÷ (1100 × 0.66 × 0.9) = 3.3, so four fixtures.
Which inputs move the answer, and how
Two terms in that formula are not numbers you look up. The calculator derives them from the room, which is why it will not return a count until you give it a ceiling height. Coefficient of utilization comes from the room cavity ratio, the standard measure of how tall a room is relative to its floor area.
- h = mounting height above the surface being lit, in feet
- L, W = room length and width in feet
Example: a 12 by 12 ft room with an 8 ft ceiling gives RCR = 5 × 8 × 24 ÷ 144 = 6.7, which interpolates to CU 0.66 for light surfaces in the table below.
Those coefficients are the published zonal-cavity values for a 6 in LED downlight (Cooper Lighting HALO, report P21277), so you can read your own room off the table below: work out RCR, then interpolate between the nearest rows. RCR 6.7 sits seven tenths of the way from the RCR 6 row to the RCR 7 row, 0.69 down to 0.64, giving 0.66. The same room at a 12 ft ceiling reads RCR 10.0 and CU 0.52: identical floor area, but 27 percent more light to hold the same level, because a deeper cavity throws more of it onto the walls.
| RCR | Light surfaces (80/50) | Medium (70/50) | Dark (50/30) |
|---|---|---|---|
| 1 | 1.08 | 1.06 | 0.99 |
| 2 | 0.98 | 0.96 | 0.89 |
| 3 | 0.89 | 0.87 | 0.80 |
| 4 | 0.81 | 0.80 | 0.72 |
| 5 | 0.75 | 0.74 | 0.66 |
| 6 | 0.69 | 0.68 | 0.60 |
| 7 | 0.64 | 0.63 | 0.55 |
| 8 | 0.59 | 0.58 | 0.51 |
| 9 | 0.55 | 0.55 | 0.47 |
| 10 | 0.52 | 0.51 | 0.44 |
Reflectance pairs are ceiling and wall, at the 20 percent floor cavity reflectance the table is tabulated for. These are luminaire-lumen coefficients from absolute photometry, so fixture efficiency is already inside the lumen rating and must not be applied twice. That is why the top row passes 1.0: a shallow room with a pale ceiling returns slightly more than the fixture's own output to the plane.
| Input | Enters through | Effect in a 12 by 12 ft room, 8 ft ceiling |
|---|---|---|
| Ceiling height | CU, by way of RCR, and the even spacing limit | CU 0.66; 0.52 at a 12 ft ceiling |
| Room surfaces | CU, by which reflectance row is read | 0.66 light, 0.65 medium, 0.57 dark |
| Measured at | CU, by shortening the cavity 3 ft to a work surface | 0.66 at the floor, 0.80 at a work surface |
| Light loss factor | LLF, directly | 0.90 for LED in a clean interior |
| Insulation above the ceiling | Nothing in the count | Selects the NEC clause only |
The utilization factor field shows the derived number rather than hiding it, so you can change a ceiling height or a surface and watch it move; type your own and it holds until you change something it depends on. Light loss factor is a maintenance allowance rather than a geometry result, designing against 90 percent of day-one output so the room still meets its target years later. The lumen figure you start from is measured under ANSI/IES LM-79, and the depreciation this allowance covers is what ANSI/IES LM-80 testing measures and ANSI/IES TM-21 projects out to a rated life. Insulation is the one input there that never moves the count: it decides which NEC clause applies to the fixture you buy, not how much light reaches the floor.
How much light does each room need?
Two different numbers answer that, and mixing them up is the most common mistake in recessed lighting design. A room average is what a ceiling grid delivers across the whole floor, and it is what sets the fixture count. A task level applies to one work surface, like a kitchen counter, and it is met with light aimed at that surface. Designing a whole ceiling to a task level over-lights the room, wastes energy and costs more than it needs to.
One lumen per square foot arriving at a surface equals one foot-candle, and fixture lumens are not arriving lumens. Once CU and LLF are applied, a room needs roughly 1.5 to 2 times as many installed lumens per square foot as its foot-candle target. Calculators that divide area by fixture lumens and stop there under-count for that reason.
Room averages, which set the fixture count
These are the levels the calculator designs to. They reflect residential design practice, set out in ANSI/IES/ALA RP-11, and the published IES ambient minimum sits beside each one so you can see the floor you are designing above. Where a room has no task in it, that published figure is a circulation minimum: a living room reads 3 foot-candles, the level that lets you cross a room safely, not the level anyone lights a living room to. If your space is not listed, or you are working to a specification, choose Custom level and type the figure: it is used exactly as entered, and the working says so rather than implying an IES basis it does not have.
| Room | Room average (fc) | Room average (lux) | IES ambient minimum (fc) |
|---|---|---|---|
| Living or family room | 15 | 161 | 3 |
| Bedroom | 10 | 108 | 5 |
| Kitchen | 20 | 215 | 5 |
| Bathroom | 20 | 215 | 5 |
| Dining room | 15 | 161 | 5 |
| Home office | 30 | 323 | 20 |
| Laundry or utility | 20 | 215 | 20 |
| Hallway, landing or entry | 10 | 108 | 3 |
| Stairs | 10 | 108 | 5 |
| Garage or workshop | 10 | 108 | 5 |
| Walk-in closet or pantry | 30 | 323 | 30 |
IES task levels inside a room
These come from Table 33.2 of the IES Lighting Handbook, 10th edition, as reproduced in the U.S. Department of Energy Building America guideline Strategy Guideline: High Performance Residential Lighting. They are reference values for the surfaces named, not targets for a ceiling grid. Light them with undercabinet strips, vanity fixtures or pendants rather than adding downlights to the room count.
| Room | Task position | Foot-candles | Lux |
|---|---|---|---|
| Kitchen | Prep counter | 50 | 538 |
| Kitchen | Sink | 30 | 323 |
| Kitchen | Cooktop | 30 | 323 |
| Kitchen | Breakfast area | 20 | 215 |
| Bathroom | Vanity, grooming | 30 | 323 |
| Bathroom | Toilet | 10 | 108 |
| Dining room | Study use at the table | 20 | 215 |
| Closet | Walk-in | 30 | 323 |
| Closet | Non-walk-in | 10 | 108 |
Horizontal illuminance is measured at the floor for most rooms, and at a work surface about 3 ft up only where a working area exists. The calculator applies that split automatically and reports which plane it used. One foot-candle equals 10.764 lux.
How many recessed lights for a 12x12, 10x10 or 20x20 room?
A 12 by 12 ft living room takes four 6 in downlights at 1,100 lumens. The same room as a bedroom takes two. A 10 by 10 ft room takes four as a living room, and a 20 by 20 ft living room takes nine. The room average you design to moves the count as much as the floor area does.
Every figure below comes from this calculator, using 6 in can lights at 1,100 lumens on an 8 ft ceiling with light surfaces. Change the fixture, the ceiling height or the room average and the numbers move with it.
| Room size | Area | Living room, 15 fc | Bedroom, 10 fc | Kitchen, 20 fc |
|---|---|---|---|---|
| 8 by 10 ft | 80 sq ft | 2 | 2 | 4 |
| 10 by 10 ft | 100 sq ft | 4 | 2 | 4 |
| 12 by 12 ft | 144 sq ft | 4 | 2 | 4 |
| 14 by 12 ft | 168 sq ft | 4 | 4 | 6 |
| 12 by 16 ft | 192 sq ft | 4 | 4 | 6 |
| 14 by 20 ft | 280 sq ft | 6 | 4 | 8 |
| 20 by 20 ft | 400 sq ft | 9 | 6 | 9 |
Ceiling height moves these numbers in a direction that catches people out. Raising a ceiling does not automatically demand more fixtures, it demands brighter ones, because the same beam spreads over more floor from higher up. Dropping to a 7 ft basement ceiling has the opposite effect: the pools of light shrink, so fixtures need to sit closer together, and the calculator says so.
Recessed lighting layout room by room
The grid is the starting point, then each room bends it around what people actually do there. Most lighting layout tools stop at that grid. The sections below are the placement guide for the judgment calls the arithmetic leaves open. A small kitchen, bathroom or bedroom usually lands on two to four lights, so in a small room the wall offset decides the result more than the spacing between fixtures does.
- Kitchen. Run the main rows parallel to the counter, and put an island on its own pair or row rather than letting the room grid decide.
- Living room. Where to place the perimeter row matters more than the middle of the ceiling. Keep it far enough in that the beams wash the walls instead of grazing them, and treat a fireplace or media wall as its own accent layer. A family room built around a television wants the same treatment, with fixtures kept off the screen wall so nothing reflects in the glass.
- Bedroom. Aim for a low general level and keep fixtures out of the strip directly above the bed, where a downlight sits in your eyeline when you lie back. In a master bedroom, position the grid around the bed and give reading positions their own pair rather than lifting the whole room.
- Bathroom. Can lights handle the room, but the mirror needs its own light at face height. A can directly above the mirror throws shadows down the face, which is the opposite of useful.
- Hallway. A single row down the center at 4 to 6 ft spacing. Judge this one at floor level, because a corridor has no working plane.
- Basement or laundry. Low ceilings tighten the spacing, and shallow housings become the practical constraint when the joist bay is only 2 by 6.
Where to place recessed lights in a kitchen
Proper placement in a kitchen starts at the counter, not at the ceiling grid. Set the working row about 24 in out from the face of the upper cabinets so the beam lands on the worktop instead of the cabinet doors, then let the rest of the fixtures fill the walkway on the room grid. Positioning an island is a separate job again: two or three lights centered on the island at 24 to 30 in apart, judged against the island rather than the room average.
Placing that first row settles the layout, and two things can move a light off it once you cut the recess. Joists run at 16 or 24 in centers, so a housing that lands on one has to shift. A ceiling fan needs clear air under it as well, because a beam chopped by turning blades reads as a flicker. Check both before the first hole goes in the ceiling.
4 inch vs 6 inch recessed lights
Pick 6 in for general room lighting and 4 in for tighter or accent work. The choice changes the look and the beam width, not how much light the room gets, because output is set by the lamp module rather than the hole in the ceiling.
The standard size in US homes is 6 in, with 4 in a close second on newer ceilings, and one 4 in unit is usually enough for a closet. Aperture is the trim diameter rather than the cut-out, so check the rough-in dimension on the spec sheet before anyone cuts a ceiling.
| Aperture | Typical output | Best suited to | Spacing effect |
|---|---|---|---|
| 2 to 3 in | 400 to 800 lm | Accent, niches, closets, tight soffits | Closer spacing, narrower pools |
| 4 in | 650 to 900 lm | Smaller rooms, task zones, modern ceilings | Slightly closer than 6 in |
| 5 to 6 in | 900 to 1,500 lm | General lighting in most rooms | The reference case for the half ceiling height rule |
| 8 in | 2,000 lm and up | Tall ceilings, large open spans | Wider spacing, fewer fixtures |
Mixing apertures in one room is normal practice: 6 in units for the ambient grid, 4 in units picking out a bookcase or a run of art. Keep the trim finish and color temperature consistent when you do, because a mismatch in either reads as a mistake far more than a mismatch in size.
Can lights, pot lights and high hats: the same fixture
Recessed lighting means a light fixture set up inside the ceiling so its trim finishes flush with the surface rather than hanging below it. Can light, pot light, high hat and downlight all describe that same fixture, and the calculator treats them as one thing. The words are regional and trade habits rather than product categories. Pot light is common in Canada, high hat turns up in older US trade usage, and downlight is the term you will see on a specification sheet.
Canned lighting is that same fixture in adjectival form, so canned lighting spacing and recessed lighting spacing are one question. The genuinely different option is track lighting, which mounts on a surface rail and suits a ceiling with no cavity to recess into.
Canless is a genuine distinction rather than a synonym. A traditional fixture drops a metal can into the ceiling with the light module inside it, while a canless unit is a self contained LED plate with a remote driver that clips straight into the drywall cut-out. Both lay out with the same arithmetic, and only the housing depth and cut-out size differ, which matters in a shallow joist bay.
NEC rules that govern recessed luminaires
Recessed and canless fixtures sit in Article 410 Part X of the National Electrical Code, Special Provisions for Flush and Recessed Luminaires. Two clearances decide which fixture you are allowed to install, and both turn on whether the unit is marked Type IC.
- NEC 410.116(A)(1). A luminaire not identified for contact with insulation must keep its recessed parts at least 13 mm, half an inch, away from combustible material. The points of support and the trim finishing off the ceiling opening are allowed to touch.
- NEC 410.116(A)(2). A Type IC luminaire is identified for contact with insulation and may touch combustible material at its recessed parts, supports, and the portions passing through the opening.
- NEC 410.116(B). Thermal insulation must not sit above a recessed luminaire, or within 75 mm, 3 in, of its enclosure, wiring compartment, ballast, transformer, LED driver or power supply, unless the luminaire is identified as Type IC.
- NEC 410.115(A). Luminaires must be installed so adjacent combustible material is not subjected to temperatures above 90 °C, 194 °F.
The practical read: if there is insulation above that ceiling, an attic or a blown cavity, you need Type IC rated fixtures. Non-IC units in an insulated ceiling either need a 3 in cleared zone maintained around every housing, which nobody reliably keeps clear, or they are simply the wrong choice. Verify the current edition against your local adoption, because jurisdictions run on different code cycles. Energy rules apply on top: the 2021 IECC section R404.1 requires permanently installed fixtures to use high efficacy sources, and California Title 24 sets its own percentages by room with JA8 certification. LED downlights clear both without effort.
Once the layout is fixed, the circuit is the next question. Add up the connected wattage the calculator reports, convert those watts to amps at 120 V to see how much of a 15 A or 20 A circuit the lighting takes, then size the branch circuit conductor for that load. If you already know the gauge and want its rating, the wire gauge chart gives ampacity per size.
Common recessed lighting layout mistakes
- Forgetting the wall offset. Fixtures spread evenly across the middle with a full spacing left at each end leaves the perimeter dark. The end gap should be half the spacing.
- Treating the ceiling height rule as the whole answer. It controls evenness, not brightness. A kitchen and a bedroom of the same size get the same grid from that rule and very different fixture counts from the light they need.
- Chasing counter light with the room grid. Raising the whole room to counter levels over lights everywhere else. Task layers exist for this.
- Ignoring the joists. A grid drawn on paper meets framing at 16 or 24 in centers. Check the joist direction before committing, because a fixture that lands on a joist has to move.
- Using non-IC can lights under insulation. A code violation and a fire risk, and the cheapest mistake on this list to avoid.
- Running the grid through a sloped ceiling. A sloped or vaulted ceiling changes the spacing along the rake and needs adjustable or angle cut trims to stop the beams firing across the room.
Once the layout is set, the next step is putting the lights in. Our guide on how to install recessed lighting covers choosing the housing, wiring the cans in parallel, meeting the NEC clearances, and what the job costs.
This calculator supports planning and estimating. Lighting results depend on fixture photometrics, room surfaces and maintenance, and the values here are practice ranges rather than a substitute for a photometric layout. Verify every electrical detail against the National Electrical Code edition your jurisdiction enforces, the manufacturer's instructions, and your local authority having jurisdiction. Work on live circuits should be carried out by a licensed electrician.
Frequently Asked Questions
How do you calculate how many recessed lights you need?
How many recessed lights for a 12x12 room?
How far apart should recessed lights be?
How far should recessed lights be from the wall?
Do I need Type IC recessed lights?
Is 4 inch or 6 inch recessed lighting better?
Get early access to OhmNexus Pro
Join the list for new calculators, guides and services, plus first access to our upcoming advanced and AI-assisted design tools. No spam; unsubscribe anytime.
Need more electrical tools?
View All Calculators